| CALL US! (814) 899-0796 |
|---|

Bevel Buddy Manual
Bevel Buddy™ Instruction
We at Precision Sharpening Devices Inc. believe there are two very important steps in maximizing the savings this equipment can provide your company. First, use this manual to educate your operators in the proper set-up and operation of this equipment. Second, plan to keep the knives sharp at all times. Do not let the knives go beyond the resharpening point. A chipper is no better than the knife edge itself. We always invite your questions and comments concerning our products. We feel that these innovative resharpening devices will help you remain competitive in the wood processing industry.
Table of Contents:
1. Safety Instructions
2. Type of machine the sharpener is being used on and which abrasive to use
3. Proper Operating Procedures
4. Abrasive indexing procedure
5. Assembly view and parts list
6. Bevel Buddy™ Accessories
7. Limited Warranty
1. Safety Instructions READ BEFORE USING
• Do not expose this sharpener to rain or wet conditions.
• ALWAYS remove the battery from the tool or disconnect from the power source before making any adjustments or changing / indexing the abrasive, and storing the sharpener in the supplied storage case.
• When the battery pack is not in use, do not store it around any loose metal objects, keep it in the storage box.
• If the battery ever has leakage, remove it from use and replace it with a new one.
• DO NOT store the sharpener or the battery in temperatures below 32º or above 113º Fahrenheit, battery or motor damage may occur. Charge the battery pack in temperatures between 32º and 113º Fahrenheit only as well. Please recycle your dam-aged or worn out batteries at a certified recycling center.
• ALWAYS wear safety glasses when the sharpener is in use and avoid breathing the grinding dust associated with the resharpening.
• ALWAYS lock out the chipper drive motor to ZERO ENERGY STATE before resharpening the knives.
• NEVER force the resharpener into a work area, always ease into the knife sharpening.
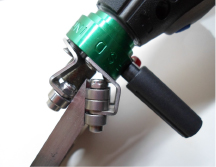
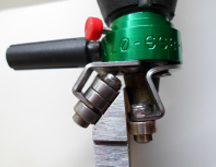
2. Type of machine the sharpener is being used on and which abrasive to use for that set-up.
When using our resharpeners you must ALWAYS counter grind / back bevel on the side of the knife that the material discharges from only!! NEVER attempt to resharpen the feed side of the knife!
Pocket mounted knife for disc style chipper, use drum style abrasive
|
 |
|---|---|
Drum style chipper knife, use drum style abrasive
|
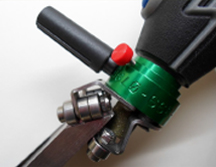 |
Face mounted style knife, use drum style abrasive
|
 |
Plywood lathe knife set-up, use cone style abrasive
|
 |
Pole Peeler or some small chippers knife set-up. Use cone style abrasive. |
 |
| Disc chipper modified set-up, there may be times on a disc chipper set-up when a knife is shortened to make a smaller chip like those used in pellet manufacturing. The universal grinding head may come in contact with the disc wear plate. In this set-up you must do two things: Use the cone style abrasive #A-MDA0197-C80 with the large end away from the drive motor. Then you may have to tune the lower set of rollers by bending them away from or back towards the drive motor approximately 3/16” to 1/4” making sure they are both bent at the same angle. This will allow the motor mount to move away from the disc wear plate. |
 |
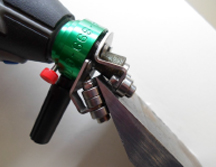
3. Proper Operating Procedures
• Before using the Bevel Buddy Resharpener make sure the proper abrasive for the task is applied to the resharping tool, refer to section 2 for the set-up.
• When performing the resharpening process on the knife, as you are facing the disc and it turns counter clockwise start the sharpening process from your right and move to the left. On a clockwise rotating disc, start the sharpening process an your left and move to the right.
• Apply very little pressure on the sharpener to knife edge. The diamond abrasive is very aggressive, so to avoid over grinding always keep sharpener in motion while sharpening the knife. One pass per knife is usually sufficient per sharpening. *REMEMBER let the abrasive do the work!
• The counter ground path on the back of the knife should be approximately 1/16” to 1/8” wide.
• We suggest resharpening the knives in the chipper no more than 3 times before removing them to be sharpened in your stationary grinder or reversed on a turn knife system.
• Drive motor operating speed for the Bevel Buddy™ Max:
▫ 12 volt battery sharpener must be started in low speed. You then increase it to high speed, sharpen your knives, then decrease back to low speed to turn it off.
▫ 12 volt charger green light will be blinking while the battery is charging and on solid green when the battery is fully charged.
▫ 12 volt corded— ON / OFF switch
▫ 120 volt — ON / OFF switch
• Clean grinder head weekly. (Blow off with compressed air only)
4. Abrasive Indexing Procedure
When the abrasive becomes worn on the drum or cone area, the drive motor can be adjusted back to a fresh area for proper sharpening.
A.) Loosen the thumb screw on the sharpener head.
B.) Hold universal grinding head and turn the drive motor counter clockwise 180º or 1/2 turn.
C.) Snug set screw slightly to lock the head and motor, this will give you a new abrasive area to sharpen your knives.
D.) This indexing procedure can be performed 3 times before the abrasive must be replaced.
E.) Make sure your sharpener is in the zero energy state—unplugged from power source.
F.) To replace the abrasive: Remove the battery from the drive motor or disconnect the drive motor from the power source. Loosen the locking set screw, turn the drive motor counter clockwise to remove the universal grinding head. Hold the spindle lock button down and twist the abrasive clockwise to remove it. Reverse the procedure to attach the new abrasive.
G.) When threading the drive motor back into the universal grinding head, make sure you DO NOT cross thread it. The motor threads are plastic.
5. Bevel Buddy™ Max Assembly view & parts list.
Click to see parts list page of PDF manual.
6. Bevel Buddy™ Accessories: Go to ORDER PAGE
7. Limited Warranty
Precision Sharpening Devices Inc. warrants this product to the original purchaser for one year from the date of purchase. We will repair, free of charge, any defects caused by faulty material or workmanship.
This warranty shall not apply to equipment or parts thereof which have been altered or repaired outside of the Precision Sharpening Devices Inc. factory, or subjected to mis-use, abuse, neglect or accident, or damage by improper installation or application.
This warranty is non-transferable and does not cover damage resulting from other than defect in material or workmanship, damage caused by unreasonable use, including the failure to provide reasonable and necessary maintenance.
This limited warranty is in lieu of all other express warranties. Any implied warranty of fit-ness for a particular purpose, merchantability or otherwise, applicable to this product shall be limited in duration to the duration of this limited warranty. Precision Sharpening Devices Inc. shall not be liable for any special, incidental or consequential damages.
Some states do not allow limitations on how long an implied warranty lasts, so the above limitations on how long an implied warranty lasts may not apply to you.
This warranty gives you specific legal rights and you may also have other rights which vary from state to state. QUALITY AND PERFORMANCE ASSURED
Addendum to the Bevel Buddy Instruction Manual
~The Pneumatic Bevel Buddy™~
The Pneumatic Bevel Buddy™ contains:
• The Bevel Buddy™ 0.9 h.p. pneumatic drive motor
• Two 1/2” duplex abrasives (part no. : A-MDA0195-D80-1*)
• Pressure regulator and gauge assembly (to be set at 90 P.S.I. max.)
• Air line swivel
• 2 oz. of pneumatic air tool oil in dropper bottle
• Collet wrench ● Safety glasses ● Instruction manual and DVD
• Storage case ● Reorder and Support information
3. Proper Operating Procedures
• Pneumatic drive motor on and off: Depress throttle lever to start, release to shut off.
• Clean grinder head weekly. Blow off with compressed air only.
• After every use of the pneumatic Bevel Buddy™ you must disconnect from the air supply and place 3-4 drops of the supplied air tool oil into the air inlet swivel. Re-connect to air supply and run the drive motor for five seconds to displace any moisture that may have entered the drive motor during operation.
FAILURE TO DO SO WILL VOID THE MANUFACTURERS WARRANTY
4. Abrasive Indexing Procedure
Please be sure to disconnect from the air supply line
before the following procedures are performed!
When the abrasive material becomes worn on the duplex abrasive, the drive motor can be adjusted back to a fresh area for proper sharpening.
A.) Loosen the red thumb screw on the sharpener head
B.) Hold universal grinding head and turn the drive motor counter clockwise 180º or ½ turn and align the red set screw with either of the two arrows.
C.) Snug set screw slightly to lock the head and motor, this will give you a new abrasive area to sharpen your knives.
D.) This indexing procedure can be performed 6 times, 1/2 turn each, before the abrasive is reversed and the Bevel Buddy head is indexed back to the start of the indexing procedure for another 6 indexes after which the duplex abrasive must be replaced.
Rev.2/16/2016
Our motto to our knived friends, “Chip more not change more!”
 |
![]()
Copyright © 2012-2021 Precision Sharpening Devices, Inc. All rights reserved. |
Website Design Copyright © 2012-2021 SandyQuiggle.com |
|---|